Updated on
Thinkific is a great platform for creating and selling courses online — you probably already know that. But course creators often overlook a very important aspect of running a course website: search engine optimization (SEO).
Optimizing your course website for search engines is a great way to get more organic traffic to your site and boost your course sales. But how exactly do you go about SEO on Thinkific?
In this Thinkific SEO guide, we’ll cover all the available options and best practices for optimizing your course website for better search visibility. We’ll also share some tips for attracting more visitors from search engines.
Let’s get started.
The first step in SEO is to make sure your website is properly optimized for search engines. This includes optimizing meta tags, page titles, and URLs to ensure that your content is properly indexed by search engines.
Thinkific has a few built-in options to help you with this. For starters, you can customize the meta tags and page titles for your course landing pages. You can also create custom URLs for each course to make them more SEO-friendly.
And then, you have similar options available for other website pages, including your homepage and the course library page.
Let’s learn how to access and use these options.
Thinkific makes it easy to access and customize SEO settings for the landing pages of your courses, bundles, communities, and memberships.
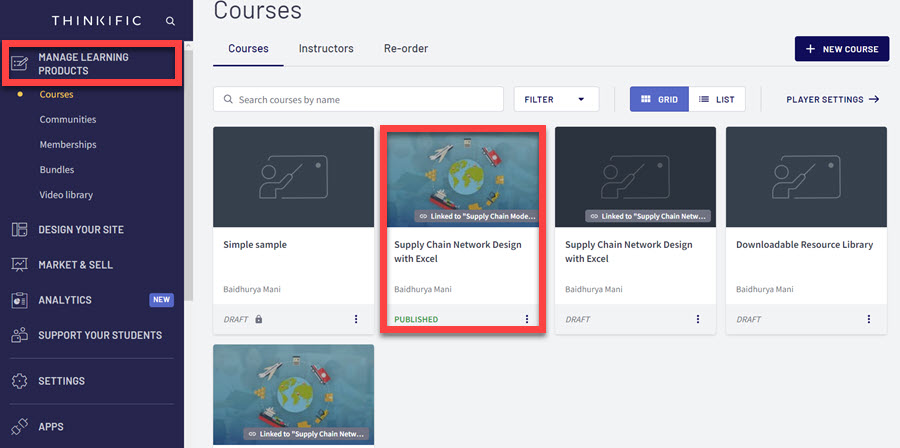
To access the SEO settings, you need to go to Manage Learning Products in your Thinkific dashboard and select the product type.
To start with a course landing page, select the Courses tab. Here you’ll see all your courses. Select the one you want to optimize the settings for.
This will take you to the course backend. From here, select Settings → SEO.
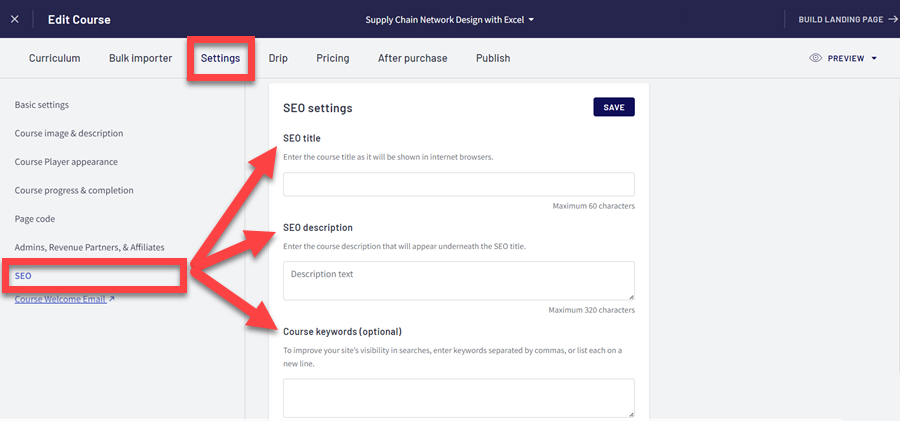
On the SEO Settings page, you can add the following:
Once you complete these fields, click Save, and you’re good to go.
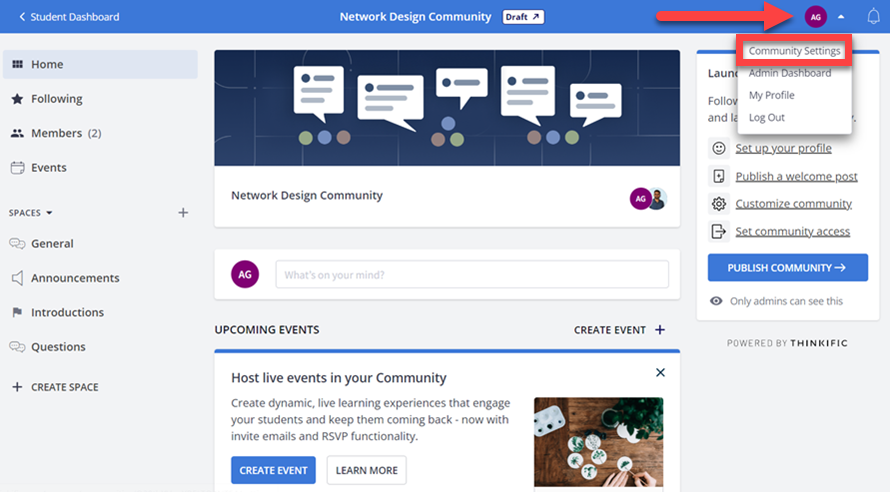
Now, if you want to access SEO settings for a Thinkific community, go back to the Manage Learning Products section, and select Communities.
Select the right community, and choose Community Settings from the drop-down menu under your profile icon in the top right corner of the page.
This will open a new page where you’ll see the Settings tab, and once you click on it, select SEO Settings.
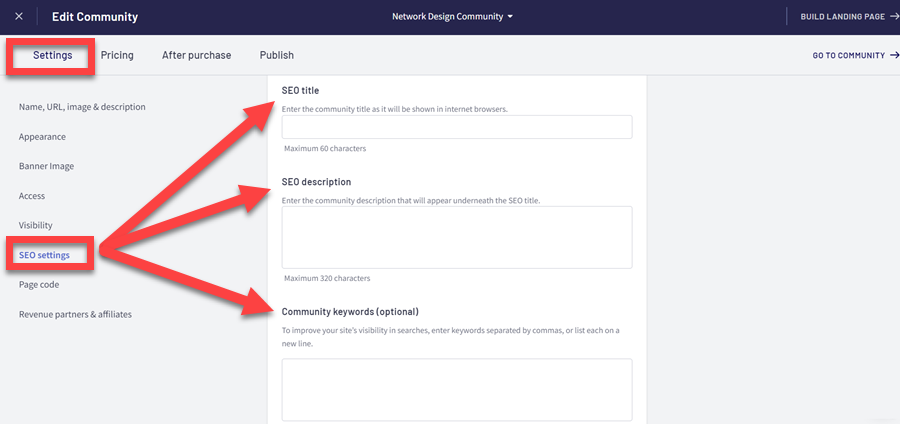
You’ll notice that the SEO fields are the same as the ones for a course page. Likewise, customizing SEO page settings for your Thinkific memberships and bundles are equally similar.
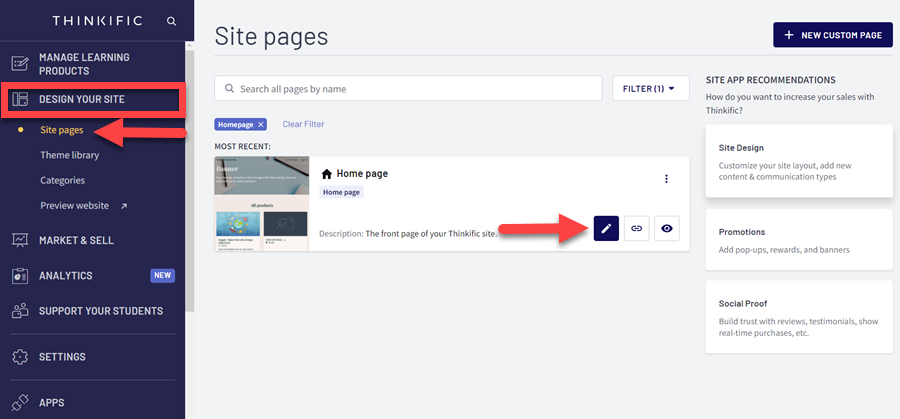
Apart from the product pages, Thinkific also lets you optimize other site pages, such as the homepage, course listings page, sign-in page, etc., for SEO.
You can access these pages from Design Your Site → Site Pages in your Thinkific dashboard.
Here you can use the filter option next to the search bar to find a specific page.
Next, click on the Pencil icon next to the page you want to edit, which is, in this case, the homepage.
This will take you to the page builder, and you need to click on the cog icon at the top-left side of the page.
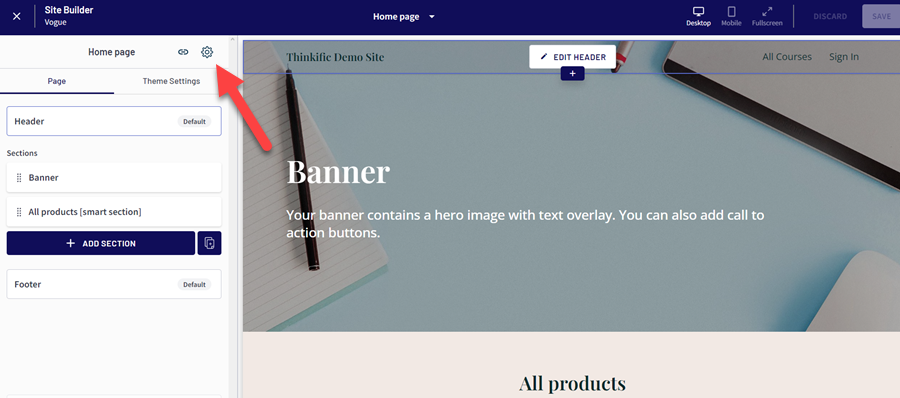
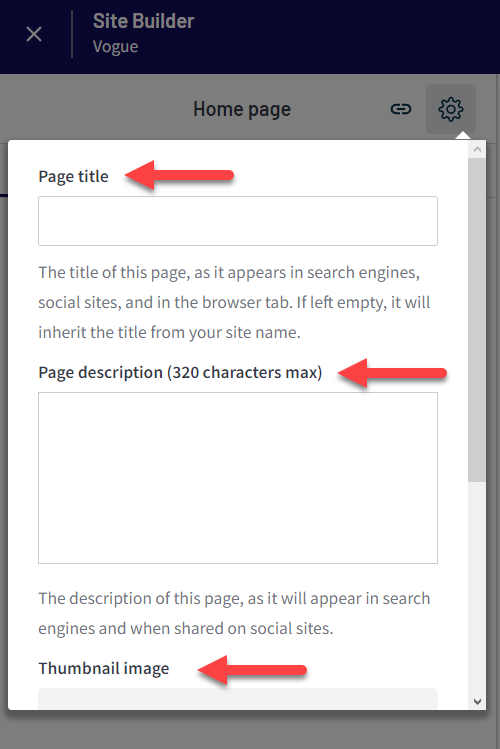
Once you click on it, you’ll see the option to add a page title and description and upload a thumbnail image.
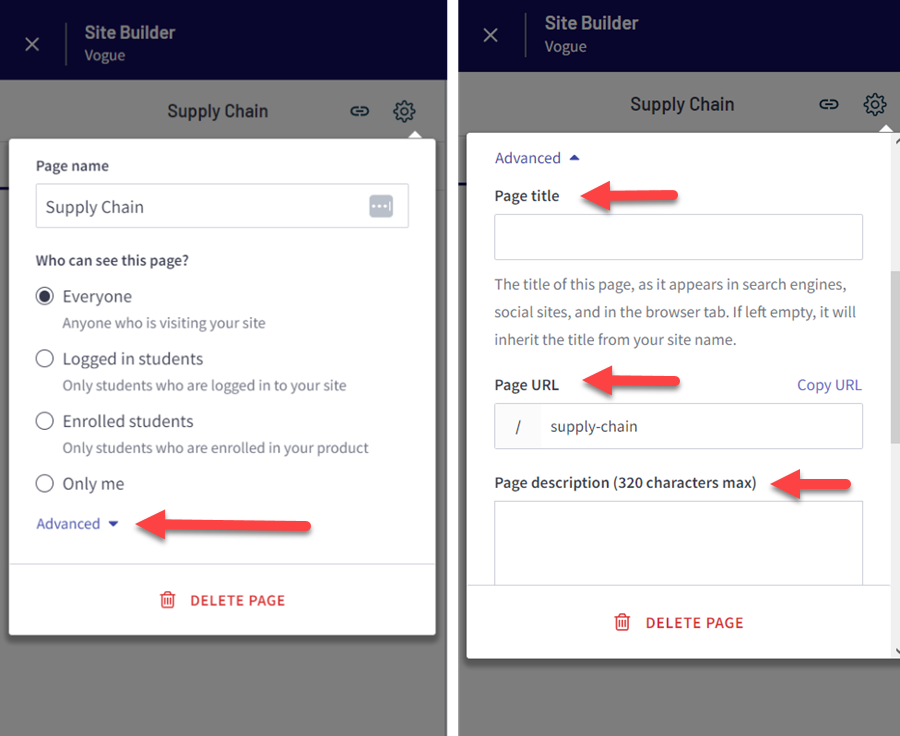
When customizing SEO settings for other non-product pages on your site, the steps will be the same. However, you’ll have one additional step.
When you open the page settings, click Advanced to see all available settings.
That’s all! This is how you can optimize your Thinkific site pages for search engines.
Now, making your site search-engine friendly isn’t something you should do once and forget about. Instead, you should track your SEO performance so you can improve it. And there are several ways to do that.
The first is to connect your Thinkific website to Google Search Console.
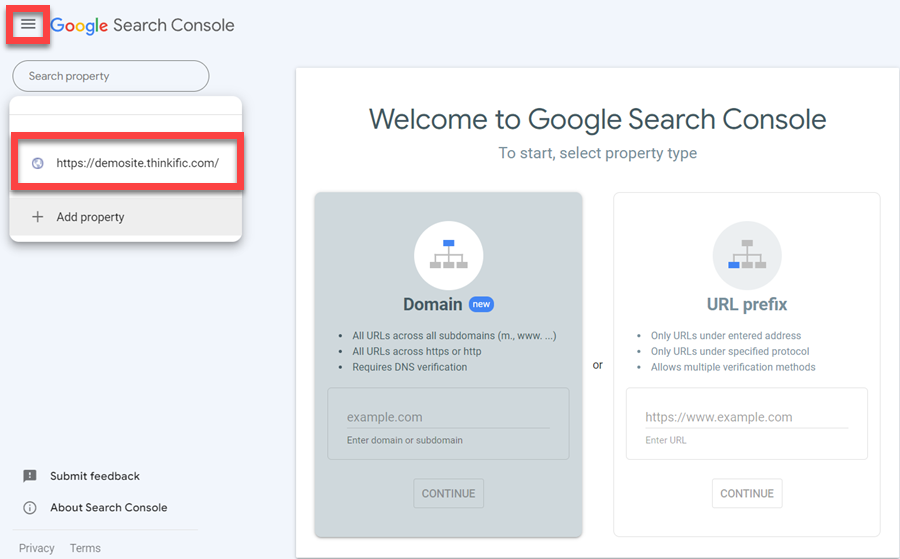
To start, go to Google Search Console, sign in, and select URL Prefix as the property type.
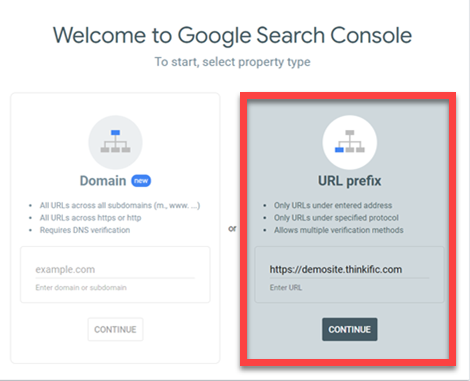
In this box, enter your Thinkific domain or a custom URL and click on Continue. A new window will open, prompting you to select a method for verifying site ownership.
While Thinkific allows you to host your course website on its subdomain, we strongly recommend using your own domain. This approach not only enables you to white-label your Thinkific website for a professional appearance but also, importantly, enhances your domain authority, which is crucial for SEO.
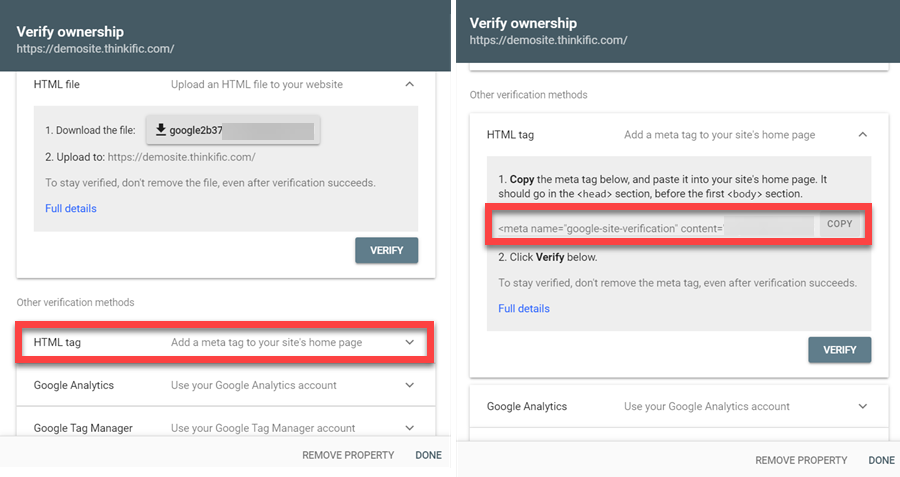
Click on the HTML tag option to reveal the collapsible content, and copy the meta tag from the box.
After that, head to your Thinkfic dashboard, and go to Settings → Code & Analytics → Google Site Verification Meta Tag.
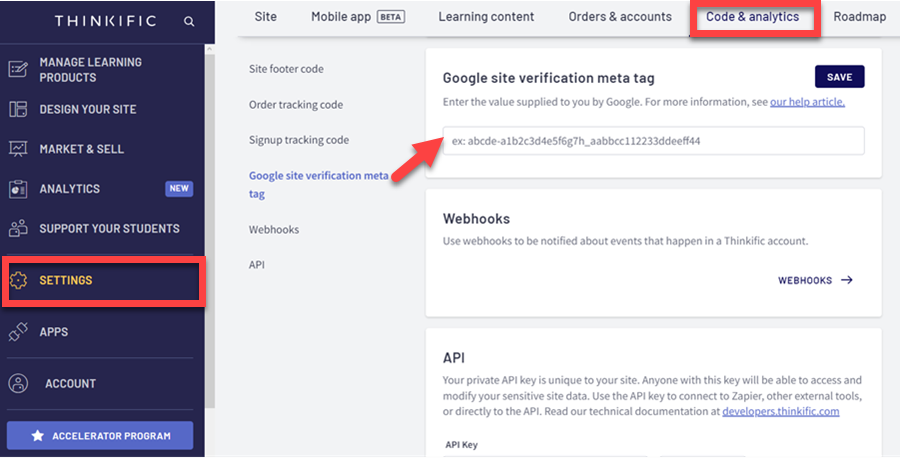
Paste your HTML tag in the corresponding field, and save the changes.
Go back to your Google Search Console, and click Verify to finalize the process.
Now you can track your Thinkific site’s performance and check the number of clicks and impressions your site gets from Google.
Another way to track your site performance in Google is by integrating your Thinkific site with Google Analytics.
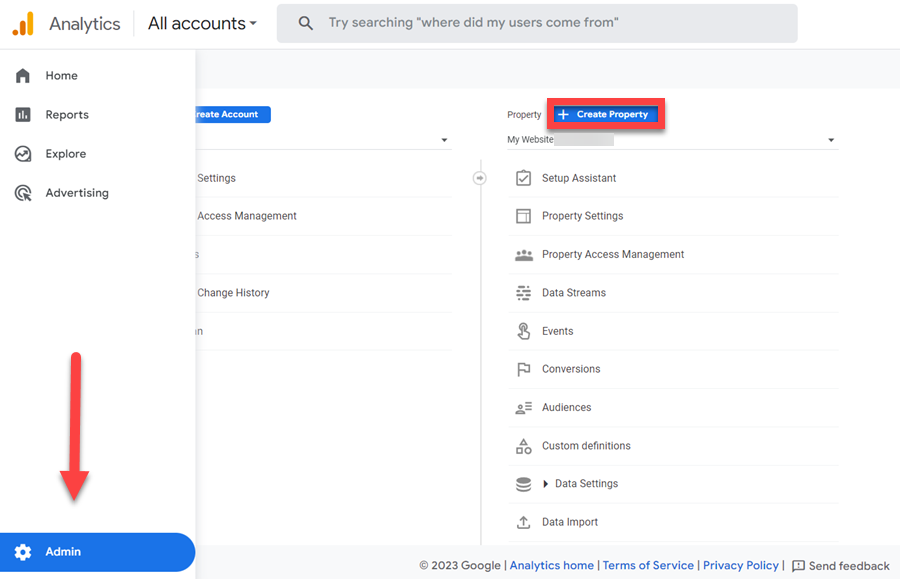
If you don’t have a Google Analytics account, create one. Otherwise, log into your existing account. Next, create a property from your homepage by hovering over the gear icon and clicking the Admin button. This will open another menu, where you’ll select Create Property.
A new window will open, where you can add a name to your property and, after that, provide some information about your business.
You will then be taken to the next page, where you can set up a data stream, i.e., a website from which Google Analytics will pull the data.
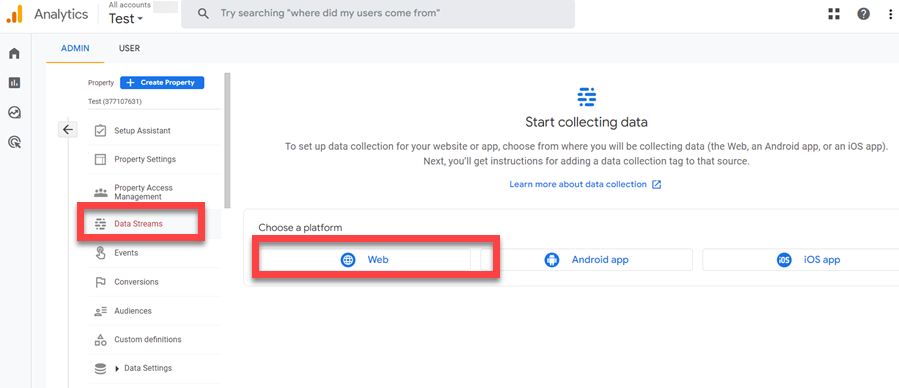
On this page, choose Web as your property platform, and on the next page, add your Thinkfic site’s URL and name.
Once you’re done, you’ll see the details of your data stream, including your Google Measurement ID.
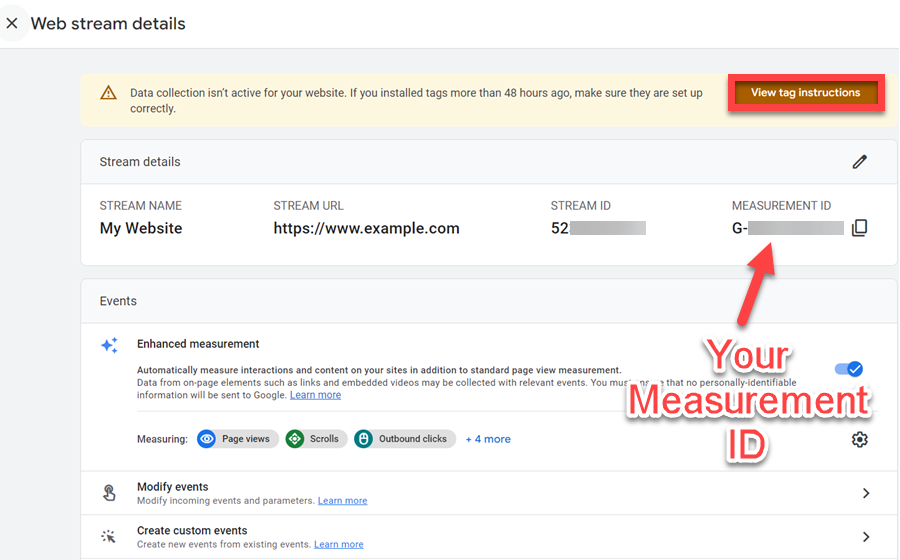
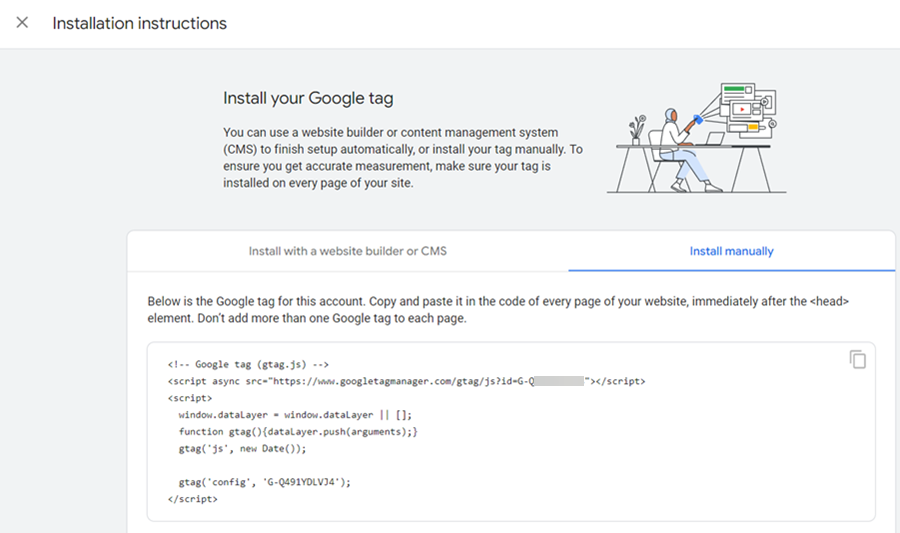
You can then copy the code and add it to your Thinkific site.
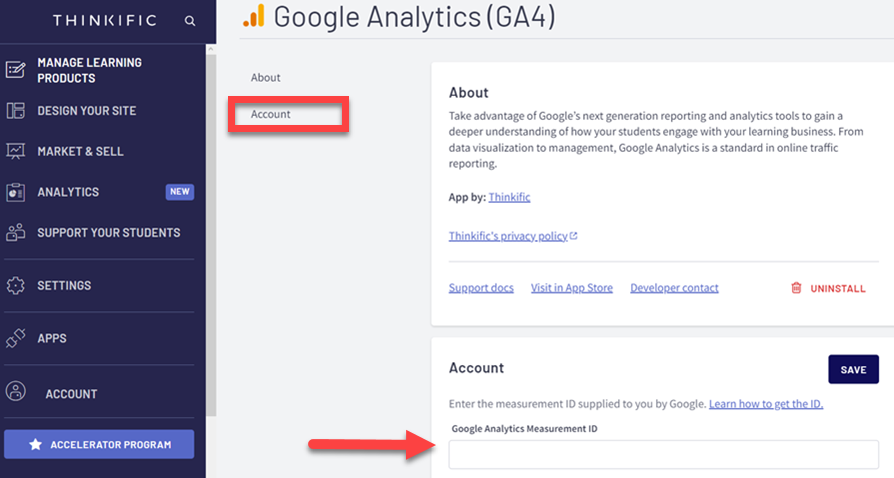
Alternatively, you can go to Thinkific’s App Store and install the Google Analytics app. Then, add your Measurement ID in the Account section.
You can now track your SEO performance in Google Analytics, too.
Another important aspect of tracking your Thinkific SEO performance is a sitemap. Meanwhile, adding your sitemap to Google’s Search Console also helps speed up your site indexing.
The good news is that you don’t have to create a sitemap because Thinkfic does this automatically for you. To access your sitemap, type your Thinkific URL in the address bar and add /sitemap.xml.
Now, go to Search Console, click on the hamburger menu in the top left part of the page, and select your Thinkific website from the drop-down menu.
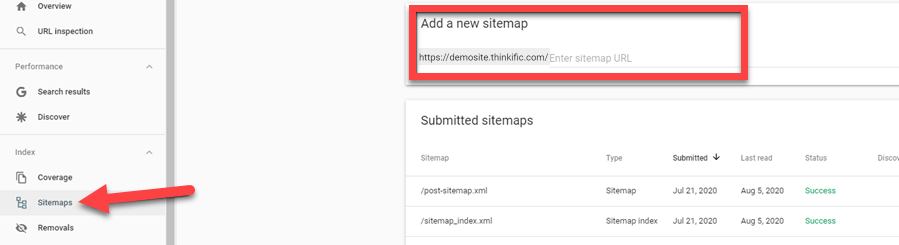
After submitting your sitemap, Google will crawl and index your website’s pages, but how long that will take varies from site to site.
Meanwhile, when you publish new pages on your website, you can also request Google to index that page. To do this, go to your Search Console, and from the left menu, select URL Inspection and then Request Indexing.
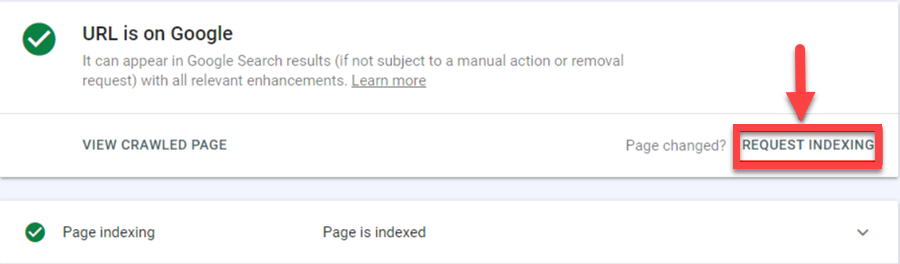
Now, indexing doesn’t mean your content will appear on the first page of Google, but it will help your content to be crawled and analyzed by Google.
So far, we’ve talked about setting up the basics and optimizing your Thinkific site for search engines.
Now, let’s go through some tips to help you further improve your SEO and get more organic traffic from search engines.
Keywords are words or phrases that people use to find information on the internet. You must know which keywords to focus on to get more visitors from search engines.
For a course website, your focus should be on targeting keywords with high purchase intent or, more specifically, bottom-of-funnel (BoFu) keywords. For example, if you teach an ethical hacking course, you may want to target keywords like “learn ethical hacking” or “ethical hacking course.”
However, these keywords are generally more competitive, and you’ll be better off targeting more specific long-tail keywords. These are keywords that are more granular and less competitive.
For example, you may want to target keywords like “how to learn ethical hacking from scratch” or “best ethical hacking course for beginners.”
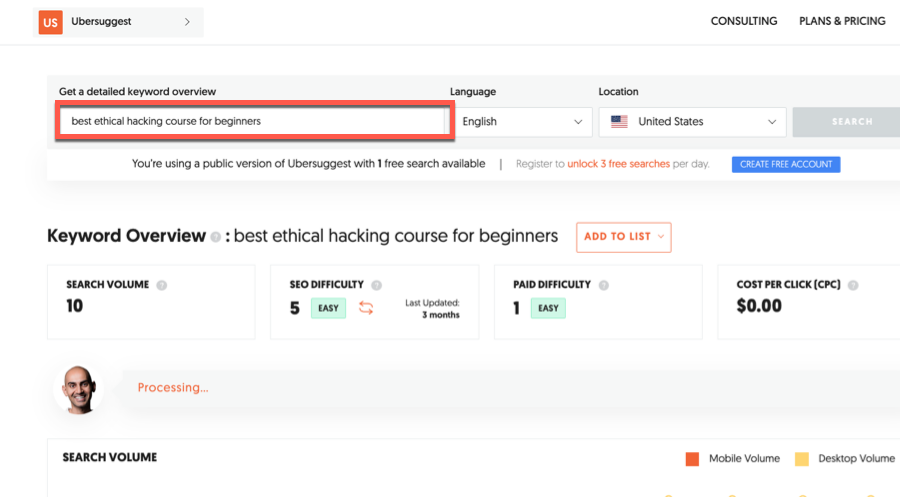
For keyword research, you can use a freemium tool like Ubersuggest that will help you identify long-tail keywords with low competition.
Once you’ve found the right keywords for your course website, you need to optimize your website pages for these keywords. Here are a few on-page optimization ideas:
Additionally, consider adding a video to your landing pages. Videos are one of the most effective content types for driving user engagement, and they can positively impact your rankings.
And if you want to learn more about on-page SEO optimization, we suggest you read Backlinko’s guide on the topic.
Apart from optimizing your website content, you also need to build backlinks to it.
Backlinks are links that other websites have added to yours. And Google looks at them as a measure of your website’s popularity and relevance. Here are a few ideas to build backlinks to your website:
Building backlinks is a tedious process and takes time. But it’s an essential part of SEO, and we suggest you read this link-building guide from Ahrefs.
As you can see, Thinkific has all the basic options for optimizing your site’s SEO, and we showed you how to access them.
But to get the best results, you need to go beyond just setting up the basic options and use the tips we discussed above: keyword research, optimizing web pages for SEO, and building backlinks.
By prioritizing SEO on your Thinkific website, you can get more organic traffic and increase your sales.
If you’re not using Thinkific yet, get started for free.
We hope you found this Thinkific SEO guide useful. Let us know in the comments if you have any questions.
Yes, Thinkific offers many options for optimizing your site and course pages for search engines. It also creates a sitemap out of the box, which you can submit to the search engines.
Thinkific lets you add SEO titles, descriptions, keywords, and thumbnail images to your website pages, all of which help you optimize your site for search engines. Additionally, you need to optimize your page content for specific keywords.
First, you need to add your website URL in Google’s Search Console and then add the site-verification tag to your Thinkific site. You can then verify your site in Search Console and access all the data related to search performance.
Copy your Google tag and then go to your Thinkific account, and from the Settings tab, go to Analytics and Code, and paste it into the Site Footer Code section.

Hello, my name is Ana, and I’m a content writer at Sell Courses Online. Specializing in course builders and community platforms, my focus is on helping you find the perfect tools for your business. I thoroughly enjoy exploring and experimenting with tools and software, and I look forward to sharing my findings with you. You can also find me on
SellCoursesOnline is supported by its audience. When you purchase through links on our site, we may earn affiliate commissions. However, this doesn’t influence our reviews or product listings. All opinions are based on our tests and personal experience with a product/service.
Copyright © 2024 by SellCoursesOnline
Hello, my name is Ana, and I’m a content writer at Sell Courses Online. Specializing in course builders and community platforms, my focus is on helping you find the perfect tools for your business. I thoroughly enjoy exploring and experimenting with tools and software, and I look forward to sharing my findings with you. You can also find me on

We respect your privacy and will never spam you.